Montage des SBN
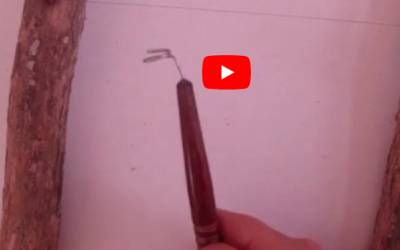
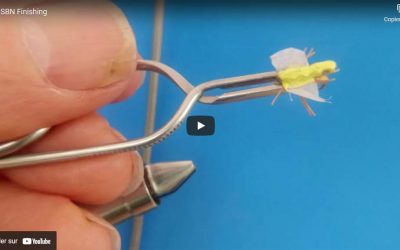
Outil SBN Dégorgeoir avec démonstration sur un fil en coton noir pour mieux voir
On voit mieux sur cette vidéo comment se servir de l’outil dégorgeoir SBN prévu pour les mouches sub-merger (pour protéger la bulle en sortant la mouche de la gueule d’une truite) mais qui fonctionne également sur n’importe quelle mouche, nymphe ou petit streamer.
English Version
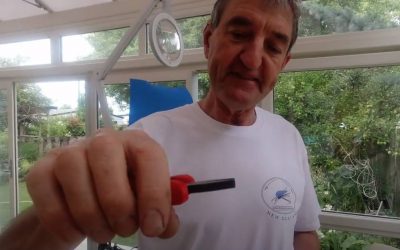
SBN Hook Removal Tool for use with SBN sub-merger trout fly demonstration
Explanation on how to use the SBN hook removal tool designed specifically for the SBN sub-merger but works on any fly, nymph or small streamer.
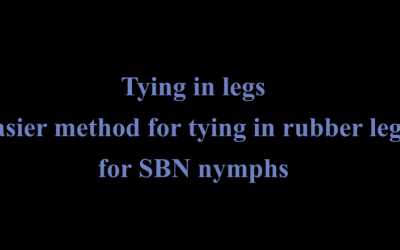
Another way of tying in rubber legs for your steel back nymph
Rubberised legs are not easy to work with – they have a mind of their own! I’ve developed an easier way (I think!) of tying in 5 or 6 rubber strands at the same time.
The first step is to add your dubbing to form the thorax. At the mid point between the ‘mast’ and hook eye tie in 5 or 6 strands of leg material with a single wrap while holding all the fibres on one side of the shank. Keep holding the fibres and bring your thread around in front of them with VERY LITTLE tension keeping as close to their base as possible.
This is tricky! Too much thread tension will make the thread ‘jump’ over the legs which then requires a reset. Bring the thread under tension behind the legs as close as possible to their base then back through the middle to split them. A further turn of thread behind the legs then add a very small amount of dubbing and wrap under the shank of the hook to conceal the thread. Bring your thread up behind the legs and encircle ‘mast’ to complete with two individual half hitches.
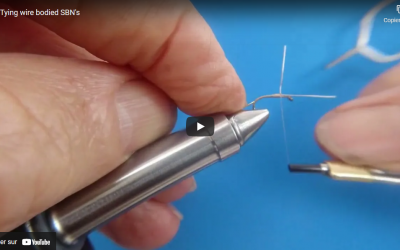
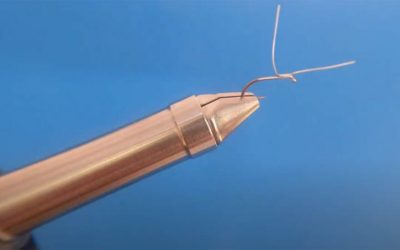
Alan’s method for tying a wire bodied SBN
Very simple operation if you have a rotary vice!
I like to tie the wire in on the far side of the hook shank drawing the wire back to parallel to the upright ‘mast’ then wrapping the thread and wire back to the bend in the hook. Leave the wire hanging and wrap your thread forward in touching turns. You should have a nice tapered base for your wire. I prefer tying off the thread at this point but you can also use a bobbin holder/rest to keep your thread out of the way.
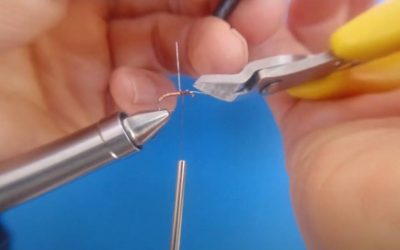
Wrap the wire forward in touching turns until the ‘mast’. Tie in your thread again or release from the bobbin holder/rest. Bring the wire under the mast and take 2 or 3 turns just in front of the mast. Ensure the wire stays on the side of the shank. The object is to avoid too much material on top of the hook between the mast and the hook eye. Excess material forces the back higher which is undesirable. You want to end up with the steel back as close to the shank as possible. Cut the wire so it finishes just behind the eye and cover with thread.
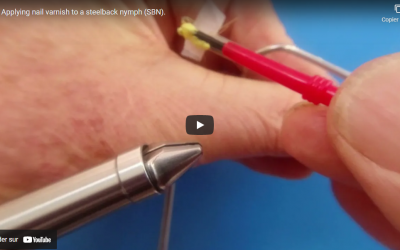
Using nail varnish to colour your steelback instead of a marker pen
To make this job easier, I recommend placing a sliver of paper (approx 20mm X 10mm) between the body and steel back before starting. Unlike the marker pen, here you are dealing with liquid which makes the operation more prone to being messy. Place the paper over the vertical wire then attach the back. The paper which is now trapped by the wire and sandwiched between the body and steelback will help to avoid getting the nail varnish over the body. Try not to get build up on the paper.
Use a dubbing needle to remove excess varnish from the paper. You should run your dubbing needle completely around the back above the paper to remove any excess varnish. It pays to repeat this step while the epoxy is still workable to remove any varnish which may have run down onto the paper. If varnish is left on the paper, when this is removed you will end up with a ‘wing’ sticking out from the underside of the steel back which is undesirable.
Applying the finishing epoxy to your SBN.
The final part of making a steel back nymph is to apply a coat of epoxy. This will protect the colour that you have applied to the steelback and most importantly adds strength to the stainless steel wires which hold the steel back in place. It is also possible to colour your epoxy which will speed the operation up. If you do this, be careful to add no more than 25% colouring or your epoxy may not set correctly. The proportions should be 50/50.
It serves no purpose to add additional hardener. In fact you may end up with epoxy which refuses to dry! I strongly recommend SLOW drying epoxy. You have more time to apply it and do any touching up before it sets. Slow drying epoxy is ultimately stronger than the fast drying product.
As for the instructions about using nail varnish, the paper makes the application of the epoxy much easier. Any excess epoxy should be removed while tacky. The very last operation is to remove the baking paper. This must be done BEFORE the epoxy starts to set. Use fine nose pliers to remove one side of the paper. The second side will pull away easily once the first side has been removed. Be careful not to catch any rubber legs in the process or you may break them off!

Astuces pour appliquer l’époxy
[ English Version ] [ Gallery ]
La partie finale du montage des SBN est très importante. Il s’agit de l’application de l’époxy. L’époxy assure de la solidité en fixant les deux fils d’inox et, en même temps, habille la nymphe. Je me sers d’un époxy qui sèche lentement – je préfère avoir un produit plus costaud que d’utiliser de l’époxy à prise rapide qui résiste moins bien. L’inconvénient avec de l’époxy à prise lente c’est qu’il a tendance à couler au départ. Si vous possédez un appareil conçu pour sécher (sorte de petite roue qui tourne, évitant ainsi que la colle ne se déplace) vous pouvez commencer aussitôt. Sinon il faut patienter 3 ou 4 minutes avant commencer l’application.
Je commence par pincer la SBN à faire dans les pinces à hackles classiques. C’est une bonne idée de pincer par l’avant de l’hameçon parcequ’une fois l’époxy mit c’est plus facile pour accrocher la nymphe dans un bloc de plastazote afin de terminer le séchage. Une fois coincée dans les pinces on peut appliquer la colle. Je me sers d’une aiguille à dubbing. Je laisse la nymphe dans les pinces et au bout de 4 ou 5 minutes je vérifie que la colle n’a pas bougé. Si oui, il suffit de la remettre en place avec l’aiguille à dubbing. Après encore 3 ou 4 minutes je retourne les pinces pour mettre la nymphe sur le dos. Il faut les placer sur le bord d’une table ou une boîte de façon que la steel back ne touche à rien.
La plupart des époxydes consistent en deux éléments qu’il faut mesurer (50/50) avant de bien les melanger. Il ne sert à rien d’ajouter plus de durcisseur. Au contraire, ça va plutôt faire prolonger le temps de séchage et rendre l’époxy moins solide. Les époxydes, même ceux qui indiquent un temps de séchage d’une heure ou plus à sécher, ne laissent pas si longtemps que ça pour les travailler avant d’être inutilisables. Je dirais que 10 minutes c’est à peu près le max. L’astuce c’est de mélanger juste assez pour ce que vous avez à faire afin d’éviter le gaspillage. Je peux faire au maximum une douzaine de SBN avant que l’époxy devient impossible à manipuler donc je mélange juste la quantité pour faire ce nombre de nymphes.
En plaçant un petit morceau de papier entre le steel back et le thorax au moment de poser le “dos”, il sera plus facile de mettre un coup de feutre (ou du vernis à ongle) ainsi que l’époxy sans être embêté par le dubbing ou les pattes.
Voici quelques astuces pour aider à mettre de l’époxy sur vos SBN:
1. Le montage de la SBN (ici une SBN050) est fini et prêt pour la pose du dos.
2. Mettre une feuille très fine, comme dans les boîtes à chaussures, (20mm X 8mm environ) et le placer sur le fil vertical avant de poser le dos.
3. Placer le dos sur le fil vertical et tirer le fil vers l’avant en passant dans les mâchoires du steel back. Le tirer vers l’arrière sous le dos mais au dessus du papier. Ramener le fil horizontal en arrière en passant toujours dans les mâchoires. Avec la pince carrée, fermer les mâchoires. Avec la pince longue, comprimer le dos sur la hampe de l’hameçon. Couper l’excès des fils et pincer de nouveau à l’endroit où ils se croisent.
4. Vue d’en dessous.
5. La couleur a été ajoutée (ici du vernis à ongles mais peut être du feutre).
6. L’époxy a été ajouté.
7. Pour dégager le papier prendre les pinces à hackle d’une main et un côté du papier avec une autre paire de pinces. le papier devrait ainsi se déchirer facilement.
8. Si jamais le papier est dur à dégager, avec 2 paires de pinces, prendre le papier des deux côtés et tirer doucement. Attention de ne pas imprisonner le dubbing ou les pattes avec les pinces. C’est très important d’enlever le papier bien avant que l’époxy soit sec sinon il sera quasiment impossible à dégager.
9. La SBN est finie. Le papier évite de poser de la colle sur le corps et le thorax de la nymphe.
10. Ces steelback ont été piquées dans un bloc de plastazote pour compléter le séchage. C’est plus facile de piquer les SBN dans la mousse avec les pinces à hackle placées à l’avant de la nymphe (côté oeillet).
Tips for epoxying steel back nymphs
The final part of tying a Steel Back Nymph, and also a very important one, is the application of epoxy. As well as dressing the nymph it also helps to lock the stainless steel wires in place adding more strength as a result. I use a slow drying epoxy which, although taking longer to set, makes for a stronger fly. You can use UV epoxy which is obviously faster but personally I’m happy to sacrifice time for strength! The only issue with slow drying epoxy is that it can tend to run while drying. If you have an epoxy fly dryer, the rotation keeps the epoxy in place until it dries enough to stop running. The alternative is to check your fly after 3-5 minutes using a dubbing needle to reposition any wayward glue.
It can be a good idea to turn your fly over at this point and leave it upside down for a while. Use the edge of a table or box to keep the steel back off the surface. It doesn’t hurt to check again after another
3 minutes or so and return your SBN to an upright position. Use classic hackle pliers to hold the nymph whilst applying the epoxy. It’s a good idea to grab the fly from the front (eye end) so that when the epoxy is tacky you can dig the nymph into some plastazote closed cell foam. It can then be left until completely dry.
Most epoxies come in 2 parts and must be of equal quantities and well mixed. Even slow drying epoxy tends to start going off after 10 – 12 minutes (always sooner than the instructions say in my experience!) so I suggest you only mix enough for that time otherwise the epoxy becomes tacky and unusable. Don’t be tempted to add extra hardening to speed up drying! You will end up with the opposite result and an unsatisfactory finish. I use a dubbing needle to apply the glue. Adding a wafer thin paper under the steel back before applying the epoxy helps to avoid getting glue on your dubbing and thorax.
Some tips to help with applying epoxy to your SBN:
1. The SBN (this one is a SBN050) has been tied and ready for the steel back to be attached.
2. Use a sliver of very fine paper (20mm X 8mm approx. Paper out of a shoe box is ideal) and place this over the vertical wire before adding the back.
3. Add the steel back and bring the vertical wire forward through the “jaws” and tuck it back underneath the steel back keeping ABOVE the paper. Pull the wire sticking out over the eye through the jaws in the opposite direction. Keep the steel back hard down and squeeze the jaws shut with flat nose pliers. Trim excess wires and ensure rearward wire is positioned under the steelback. Use narrow long nose pliers to squeeze the steel back down towards hook shank.
4. A view from underneath.
5. The steel back has been coloured (Here I used black nail polish. A sharpie can be used also).
6. The epoxy has been applied.
7. To remove the paper, grip one side with long nose pliers while holding the hackle pliers. The paper should tear easily.
8. If it has become “stuck” use another set of pliers, one on each side and pull to rip paper. The paper should be removed as soon as the epoxy is tacky. If you wait too long it can be difficult to remove!
9. The finished SBN. The paper makes it easier to apply the epoxy without getting it on legs and dubbing.
10. These steel backs have been stuck into a block of plastazote to completely dry. Attaching the hackle pliers from the front (hook eye
end) makes it easy to pull each nymph into the block.
Alternative method for tying in rubber legs
Rubber legs and rubber leg dubbing do not appear on many models of nymphs. I think it’s probably down to the fact that it’s not the easiest material to work with!
I see attractor dry fly patterns incorporating usually fairly large diameter rubber legs and there is no doubt the ‘X’ way of tying them in has proven to be a great trout taker for decades! Including rubber legs in nymphs, especially weighted smaller patterns, on the other hand appears not to be so popular. Often a bead is used for weight and this automatically reduces the space on the hook shank to add other materials.
Trying to tie in individual rubber fibres is a pain! It’s difficult to seat the legs in the correct position. To overcome this, I came up with this method that makes life a little easier! You end up with a more random tie whilst still retaining an ‘X’ like effect. Best of all, it’s relatively easy to tie the legs in just a little time consuming picking them out to complete the fly.
It’s also important to use legs appropriate to the size of hook you are using. Sourcing a supply of varied thickness rubber legs was challenging and essential for the tying of my SBN’s as many of the models incorporate these legs.
SBN 014 Tying Instructions
Alan shows how to tie a steel back nymph model 014 with a wire body and rubberised thorax.
How To Tie In Rubber Legs for SBN fishing flies
Alan demonstrates his technique for tying in rubberised legs for his steel back nymphs.
Introduction pour comment monter une ‘Steel back Nymph’
alan@steelbacknymph.com donne des explications sur les outils nécessaires pour monter vos propres ‘steel back nymph’